
For Windows based systems, if deploying VMs from base/template VMs and not performing clean installations via deployment tools you can use Microsoft sysprep to do VM customization. Sysprep is installed by default in the Windows installation directory (often c:\Windows) -> System32 -> Sysprep meaning C:\Windows\System32\Sysprep.
In my case i’ll use an AHV VM called base-win2012r2 as the template and it is running Windows Server 2012 R2.

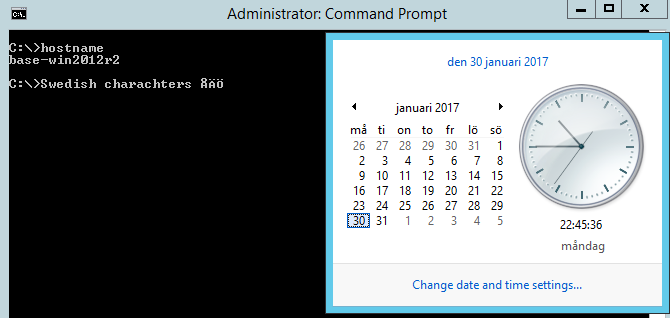
Loggin in to that VM we can see it’s configured with Swedish regional settings including e.g. keyboard, time and time zone.
For any new VM i wanted to change and perform the following actions:
- Hide ELUA Page
- Local administrator password
- Input Locale
- System Locale
- UI Language
- User Locale
- Computer Name
- Registered Organization
- Registered Owner
- Time Zone
- Product Key
- Join a domain
Prepare The Base / Template VM
The following steps were taken to prepare the base/template VM before the clone process.
- Log on to the Windows Server 2012 R2 VM
- Open command prompt (cmd)
- Navigate to the sysprep directory “c:\WIndows\System32\Sysprep

- Run the sysprep command of your choice. Based on my customization requirements i ran the following command and hit enter:
- sysprep /generalize /shutdown / oobe

- Let sysprep do it’s magic and then the VM will be shutdown

- sysprep /generalize /shutdown / oobe
Create VM From Base/Template VM
When the base/template VM is ready i took the following action to clone a new VM from the base/template VM
- Highlight the VM you want to clone, in may case base-win2012r2, and click Clone

- Provide the necessary information including the below and click Save:
- Number of Clones – In my case just 1
- Name – In my case vm-win2012r2-01
- CPU configuration – I made no changes
- RAM configuration – I made no changes
- Click the Custom Script check box and select the source of your XML sysprep file. The options you have includes:
- ADFS Path
- Upload a file accessible from the client where you run PRISM
- Type or paste the script – This is what i did


- PowerOn the newly created VM
Verify the new VM
When the VM is created and the sysprep magic is finished you should verify the changes to the VM via:
-
- Log on with the local administrator account to verify the new password
- Verify the new VM name and that it is joined to the domain

- Log on with a domain account see that the VM has joined the domain on the first screen.

- Check Date, Time and Time Zone

- Region Settings

- All other potential changes you included in the sysprep file
Unattended Sysprep File
Below is the unattended sysprep file i used apart from the passwords and product key.
<?xml version="1.0" encoding="utf-8"?>
<unattend xmlns="urn:schemas-microsoft-com:unattend">
 <settings pass="oobeSystem">
 <component name="Microsoft-Windows-Shell-Setup" processorArchitecture="amd64" publicKeyToken="31bf3856ad364e35" language="neutral" versionScope="nonSxS" xmlns:wcm="http://schemas.microsoft.com/WMIConfig/2002/State" xmlns:xsi="http://www.w3.org/2001/XMLSchema-instance">
 <OOBE>
 <HideEULAPage>true</HideEULAPage>
 </OOBE>
 <UserAccounts>
 <AdministratorPassword>
 <Value>topsecret</Value>
 <PlainText>true</PlainText>
 </AdministratorPassword>
 </UserAccounts>
 </component>
 <component name="Microsoft-Windows-International-Core" processorArchitecture="amd64" publicKeyToken="31bf3856ad364e35" language="neutral" versionScope="nonSxS" xmlns:wcm="http://schemas.microsoft.com/WMIConfig/2002/State" xmlns:xsi="http://www.w3.org/2001/XMLSchema-instance">
            <InputLocale>en-US</InputLocale>
            <SystemLocale>en-US</SystemLocale>
            <UILanguage>en-US</UILanguage>
            <UserLocale>en-US</UserLocale>
        </component>
 </settings>
 <settings pass="specialize">
 <component name="Microsoft-Windows-Shell-Setup" processorArchitecture="amd64" publicKeyToken="31bf3856ad364e35" language="neutral" versionScope="nonSxS" xmlns:wcm="http://schemas.microsoft.com/WMIConfig/2002/State" xmlns:xsi="http://www.w3.org/2001/XMLSchema-instance">
 <ComputerName>vm-win2012r2-01</ComputerName>
 <RegisteredOrganization>Nutanix</RegisteredOrganization>
 <RegisteredOwner>Acropolis</RegisteredOwner>
 <TimeZone>Pacific Standard Time</TimeZone>
 <ProductKey>XXXXX-XXXXX-XXXXX-XXXXX-XXXXX</ProductKey>
 </component>
 <component name="Microsoft-Windows-UnattendedJoin" processorArchitecture="amd64" publicKeyToken="31bf3856ad364e35"
language="neutral" versionScope="nonSxS" xmlns:wcm="http://schemas.microsoft.com/WMIConfig/2002/State"
xmlns:xsi="http://www.w3.org/2001/XMLSchema-instance">
 <Identification>
 <UnsecureJoin>false</UnsecureJoin>
 <Credentials>
 <Domain>vcdx56.local</Domain>
 <Password>topsecret</Password>
 <Username>administrator</Username>
 </Credentials>
 <JoinDomain>vcdx56.local</JoinDomain>
 </Identification>
  </component>
 </settings>
 </unattend>
7 pings
Skip to comment form ↓