

A while back i wrote a blog post about how to assign a specific user to a Horizon View VDI Desktop when using Cloud Pod Architecture CPA which is available here. This blog post will outline the steps i took when implementing CPA for a customer running Horizon View 6.0.1
Background
Horizon View was already installed in production status at data center 1 (DC1) when the decision to implement CPA was brought up.
The requirement was to have a single URL for the users to access no matter if their VDI was located at DC1 or DC2. Both Horizon View implementations must be able to operate independently of each other in case network between the DCs are down or if one DC actually fails.
The following information will be used in the configuration part:
- userid = syscpa (This is a user with all the privileges required to perform configuration)
- Password = sysCPA!pwd
- Domain = sub.domain.com
The following Horizon View Desktop Pools were in use for DC1:
- User Category 11
- User Category 12
The following Horizon View Desktop Pools were created at DC2 before CPA was implemented:
- User Category 21
- User Category 22
Solution
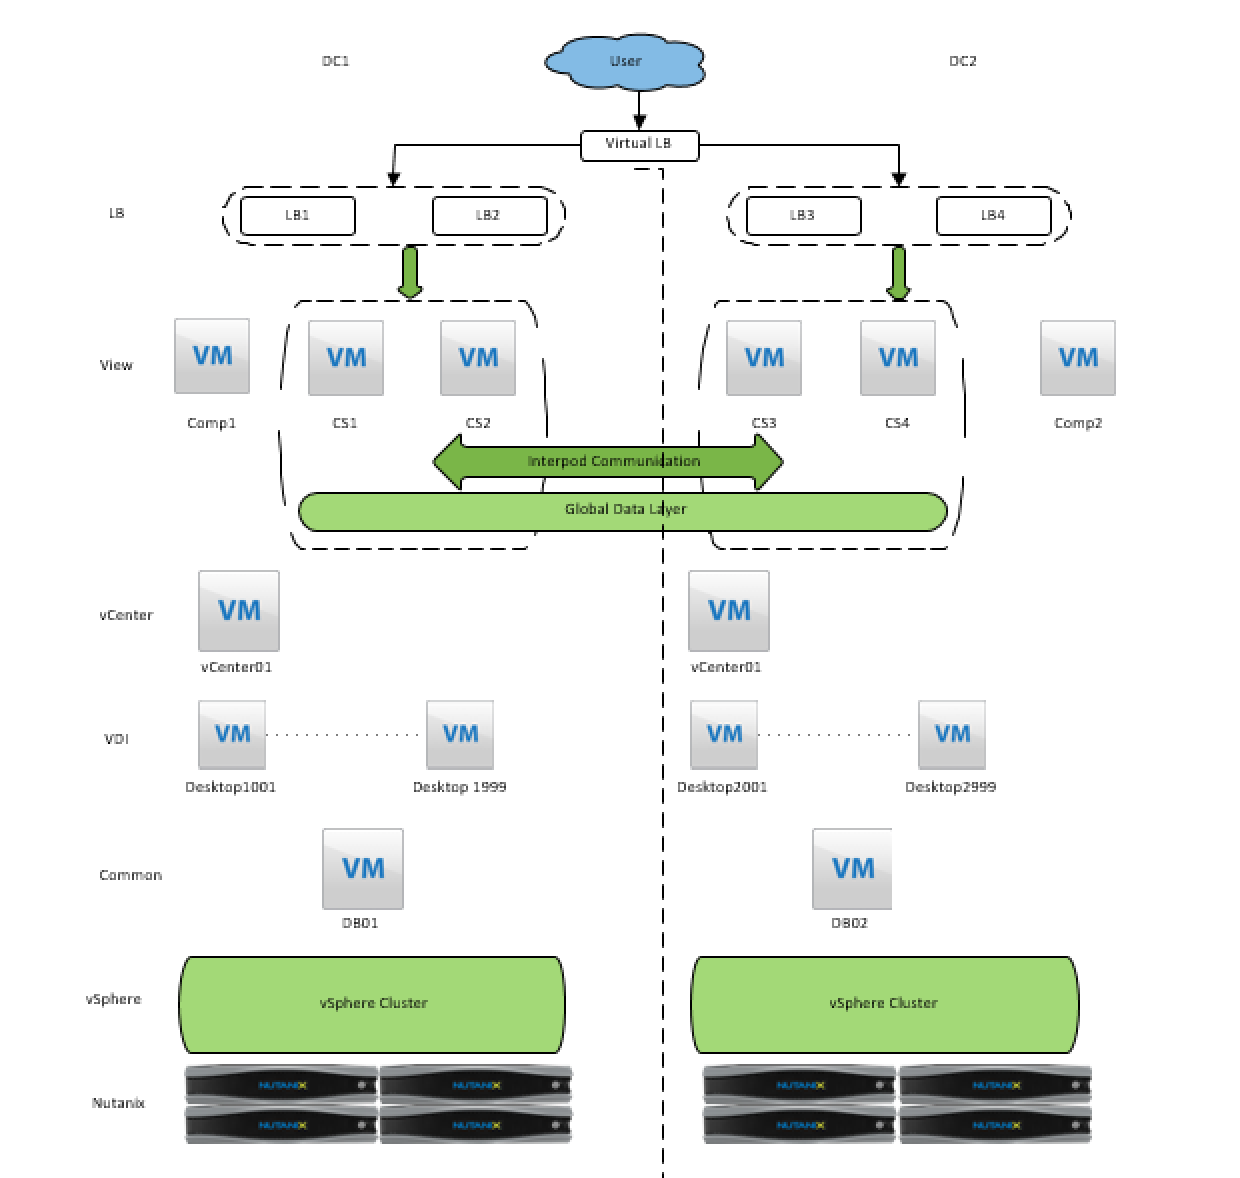
Below picture logically describes the solution pretty well, the Load Balancer of choice in this case was F5 since it was already in place at customer but others could have been used.
Configuration steps
The commands below runs from a Windows command prompt window on one of the available Horizon View Connection Servers. Configuration for DC1 runs at either Horizon View Connection Server CS1 or CS2 and configuration for DC2 runs at either Horizon View Connection Server CS3 or CS4. Some commands can run at any site and some are site specific. If not CS servers are specified the command can run on any of the CS.
Infrastructure
- Install Nutanix at DC2
- Install vSphere at DC2
- Deploy 4 VMs
- Install MSSQL
Basic Horizon View
- Install 2 x Horizon View Connection Servers
- Install 1 x Horizon Composer Server
- Configure Horizon View at DC2
- Create Horizon View Desktop Pools at DC2
Cloud Pod Architecture (CPA)
- Initialise CPA at DC2 on CS3 or CS4 using the following command:
- lmvutil –authAs syscpa –authDomain sub.domain.com –authPassword “sysCPA!pwd” –initialize
- Update CPA information for DC2 on CS3 or CS4 using the following command:
- lmvutil –authAs syscpa –authDomain sub.domain.com –authPassword “sysCPA!pwd” –updatePod –podName Cluster-DC2 –description DC2-View-Pod01 –newPodName DC2-POD01
- Join DC1 Horizon View connection servers to existing CPA configuration using the following command on CS1 or CS2:
- lmvutil –join –joinServer dc2view01.sub.domain.com –userName sub\syscpa –password “sysCPA!pwd” –authAs syscpa –authDomain sub.domain.com –authPassword “sysCPA!pwd”
- Update CPA information for DC1 using the following command:
- lmvutil –authAs syscpa –authDomain sub.domain.com –authPassword “sysCPA!pwd” –updatePod –podName Cluster-DC1 –description DC1-View-Pod01 –newPodName DC1-POD01
- Create and update CPA Sites for DC1 using the following commands:
- lmvutil –authAs syscpa –authDomain sub.domain.com –authPassword “sysCPA!pwd” –createSite –siteName “DC1-site”
- lmvutil –authAs syscpa –authDomain sub.domain.com –authPassword “sysCPA!pwd” –editSite –description “DC1 Site” –siteName “DC1-site”
- Create and update CPA Sites for DC2 using the following commands:
- lmvutil –authAs syscpa –authDomain sub.domain.com –authPassword “sysCPA!pwd” –createSite –siteName “DC2-site”
- lmvutil –authAs syscpa –authDomain sub.domain.com –authPassword “sysCPA!pwd” –editSite –description “DC1 Site” –siteName “DC2-site”
- Add CPA Pods to Sites
- lmvutil –authAs syscpa –authDomain sub.domain.com –authPassword “sysCPA!pwd” –assignPodToSite –podName “DC1-POD01″” –siteName “”DC1-site”
- lmvutil –authAs syscpa –authDomain sub.domain.com –authPassword “sysCPA!pwd” –assignPodToSite –podName “DC2-POD01” –siteName “DC2-site”
- Create Global Entitlements for DC1
- lmvutil –authAs syscpa –authDomain sub.domain.com –authPassword “sysCPA!pwd” –createGlobalEntitlement –entitlementName “User Category 11” –scope ANY –isDedicated –description “Global Entitlement DC 1 User Category 11” –fromHome –defaultProtocol PCOIP –preventProtocolOverride
- lmvutil –authAs syscpa –authDomain sub.domain.com –authPassword “sysCPA!pwd” –createGlobalEntitlement –entitlementName “User Category 12” –scope ANY –isDedicated –description “Global Entitlement DC 1 User Category 12” –fromHome –defaultProtocol PCOIP –preventProtocolOverride
- Create Global Entitlements for DC2
- lmvutil –authAs syscpa –authDomain sub.domain.com –authPassword “sysCPA!pwd” –createGlobalEntitlement –entitlementName “User Category 21” –scope ANY –isDedicated –description “Global Entitlement DC 2 User Category 21” –fromHome –defaultProtocol PCOIP –preventProtocolOverride
- lmvutil –authAs syscpa –authDomain sub.domain.com –authPassword “sysCPA!pwd” –createGlobalEntitlement –entitlementName “User Category 22” –scope ANY –isDedicated –description “Global Entitlement DC 2 User Category 22” –fromHome –defaultProtocol PCOIP –preventProtocolOverride
- Add CPA Global Entitlement to Horizon View Desktop Pool association for DC1:
- lmvutil –authAs syscpa –authDomain sub.domain.com –authPassword “sysCPA!pwd” –addPoolAssociation –entitlementName “User Category 11” –poolId “User Category 11”
- lmvutil –authAs syscpa –authDomain sub.domain.com –authPassword “sysCPA!pwd” –addPoolAssociation –entitlementName “User Category 12” –poolId “User Category 12”
- Add CPA Global Entitlement to Horizon View Desktop Pool association for DC1:
- lmvutil –authAs syscpa –authDomain sub.domain.com –authPassword “sysCPA!pwd” –addPoolAssociation –entitlementName “User Category 21” –poolId “User Category 21”
- lmvutil –authAs syscpa –authDomain sub.domain.com –authPassword “sysCPA!pwd” –addPoolAssociation –entitlementName “User Category 22” –poolId “User Category 22”
- Configure access to the CPA Entitlement for Active Directory Group(s) at site DC1
- lmvutil –authAs syscpa –authDomain sub.domain.com –authPassword “sysCPA!pwd” –addGroupEntitlement –entitlementName “User Category 11” –groupName “sub\UserCat11”
- lmvutil –authAs syscpa –authDomain sub.domain.com –authPassword “sysCPA!pwd” –addGroupEntitlement –entitlementName “User Category 12” –groupName “sub\UserCat12”
- Configure access to the CPA Entitlement for Active Directory Group(s) at site DC2
- lmvutil –authAs syscpa –authDomain sub.domain.com –authPassword “sysCPA!pwd” –addGroupEntitlement –entitlementName “User Category 21” –groupName “sub\UserCat21”
- lmvutil –authAs syscpa –authDomain sub.domain.com –authPassword “sysCPA!pwd” –addGroupEntitlement –entitlementName “User Category 22” –groupName “sub\UserCat22”
All set and done. With this configuration it doesn’t matter if a user with a desktop at DC1 desktop pool User Category 11 end up at CS3 or CS4 since they will automatically be redirected by the CPA infrastructure to the CS1 or CS2 were the is available.
4 pings